Unpack and Pack Painkiller/Necrovision game resources
Painkiller has two types of package formats: .pak and .pkm.
These are basically the same types of archives with the difference that .pkm files are loaded by the game automatically during start and .pak must be registered for the game to load.
Custom multiplayer maps are usually packed with the .pkm extension.
Notes
Don't confuse .pkm archive format with the .mpk geometry binary file.
The geometry .mpk file can be opened in Autodesk 3ds Max using this unofficial plugin.
Tools to unpack Painkiller/Necrovision game resources
- Built-in game tools using FS.ExtractPack (the most recommended option)
- Painkiller standard editor PainEditor (it can extract .pkm maps partially but is not recommended for this purpose)
- PainFull Extractor program (outdated; no source code)
- PainKillerExtractor program (outdated; source code available)
- Dragon UnPACKer (open source)
- QuickBMS (open source)
Tools to unpack Painkiller Retail Demo (Alpha) resources
Tools to pack Painkiller/Necrovision game resources back
- Built-in game tools using FS.CreatePack (recommended option for .pak archives)
- Painkiller standard editor PainEditor (recommended option for maps .pkm files)
- PainFull Extractor can add and replace files in a package (not recommended).
- QuickBMS can re-import files to a package (not recommended).
Built-in game tools
People Can Fly video game development studio provided tools for unpacking and packing resources.
Notes
This is the most reliable and recommended way to pack and unpack Painkiller resources. I also recommend using PainEditor to package map .pkm archives.
Unpack
Unpack files from .pak or .pkm archive via CLI:
Powershell (can accept relative path to the output file):
Windows cmd (need to indicate full path to the output file):
.\painkiller.exe -script FS.ExtractPack('../Data/DM_Test.pkm','C:/Users/%USERNAME%/FullPath/Games/Painkiller/Test')
Pack
To pack files back to the .pak or .pkm archive via CLI:
true is for compression.
Powershell (can accept relative path to the input file):
Windows cmd (need to indicate full path to the input file):
PainEditor (default Painkiller Editor)
PainEditor comes with the Painkiller game. It's located in ..\Painkiller\Bin\Editor.
Export all game data
Warning
This method will hang your PainEditor for several minutes and extract all files from all .pak archives to the current folders in the ..\Data directory.
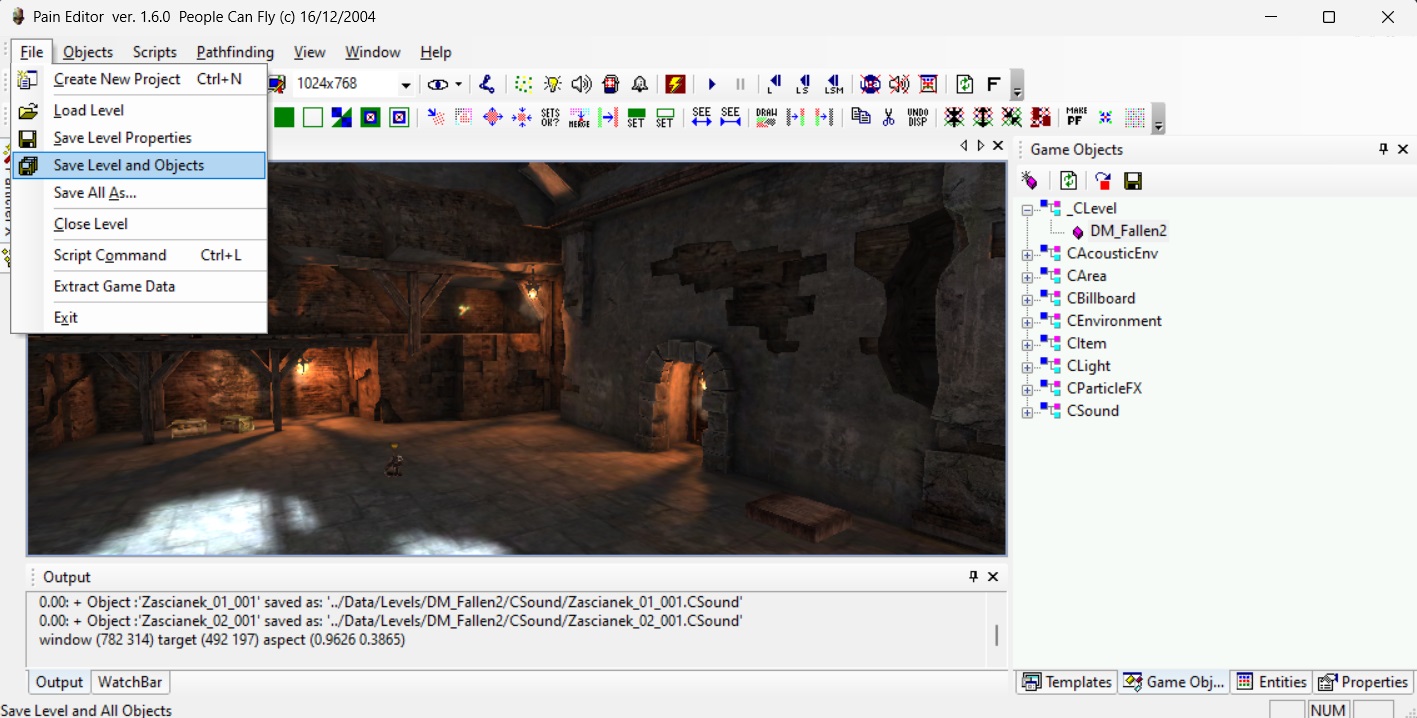
To export all game data resources, click File -> Extract Game Data.
Export a map
Warning
PainEditor does not extract some map resources and ..\Data\Levels\MapEntities with this method. MapEntities usually include cubemaps for portals and water shaders. Moreover, PainEditor will not extract other map resources, like the geometry .mpk file, Textures, level scripts for Singleplayer maps, etc. It was a common mistake in the past that many mappers did not include portal textures on their maps because of that. Thus, be aware to copy those manually if needed or extract all map resources using a different method. So, generally, it is not recommended to extract maps and resources with PainEditor.
To export a map with the editor, follow these steps:
- Click on File -> Load Level and choose the level you'd like to export.
- Once the level is opened, click File -> Save Level and Objects
After that, the extracted map files will appear in the ..\Data\Levels directory.
Pack a map to .pkm
- Place all your map resources into the ..\Painkiller\Data\ directory.
- Open your map in the editor by clicking on File -> Load Level so that the game generates sort of a cache MOPPCode (memory-optimized partial polytope) in the ..\Painkiller\Data\Maps\MOPPCode\ directory.
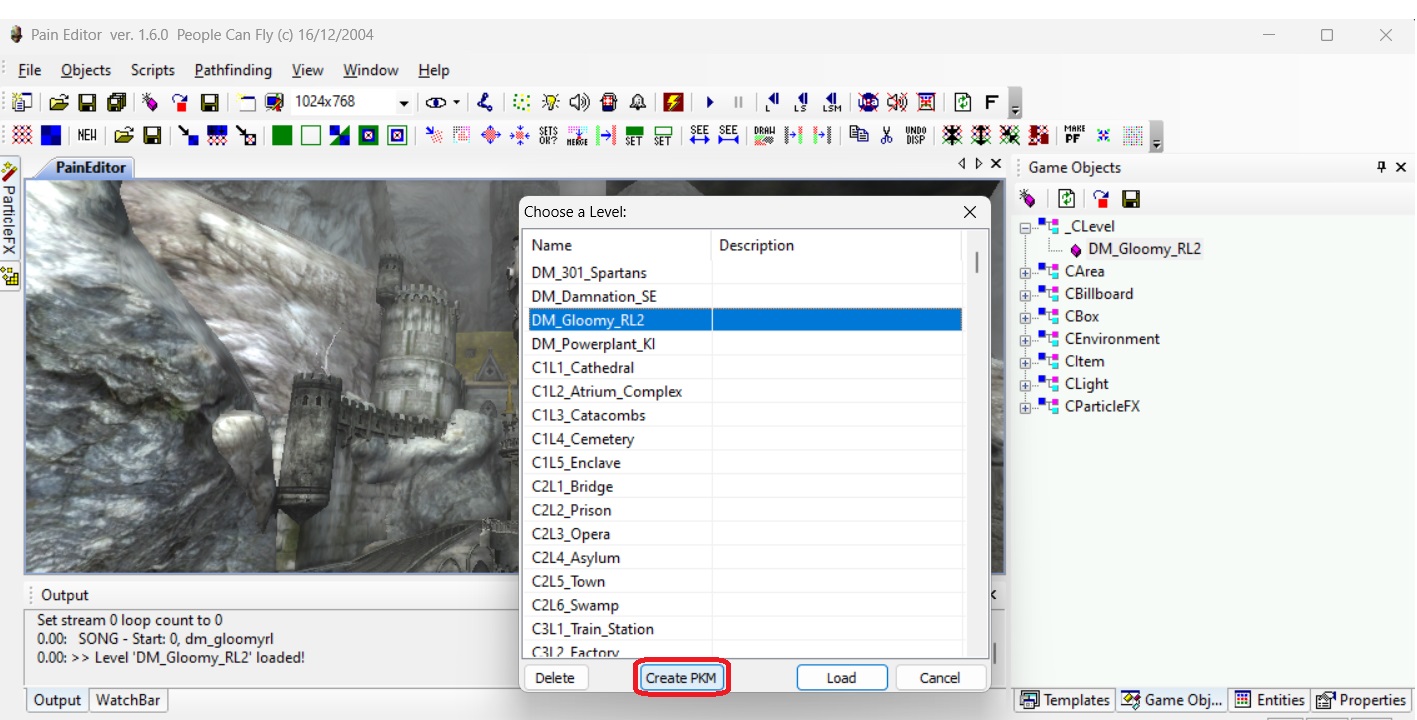
- Then save the map by clicking on File -> Load Level, click on the Level you want to pack and click Create PMK.
It will create a .pkm file inside the ..\Painkiller\Data\ directory.
PainFull Extractor
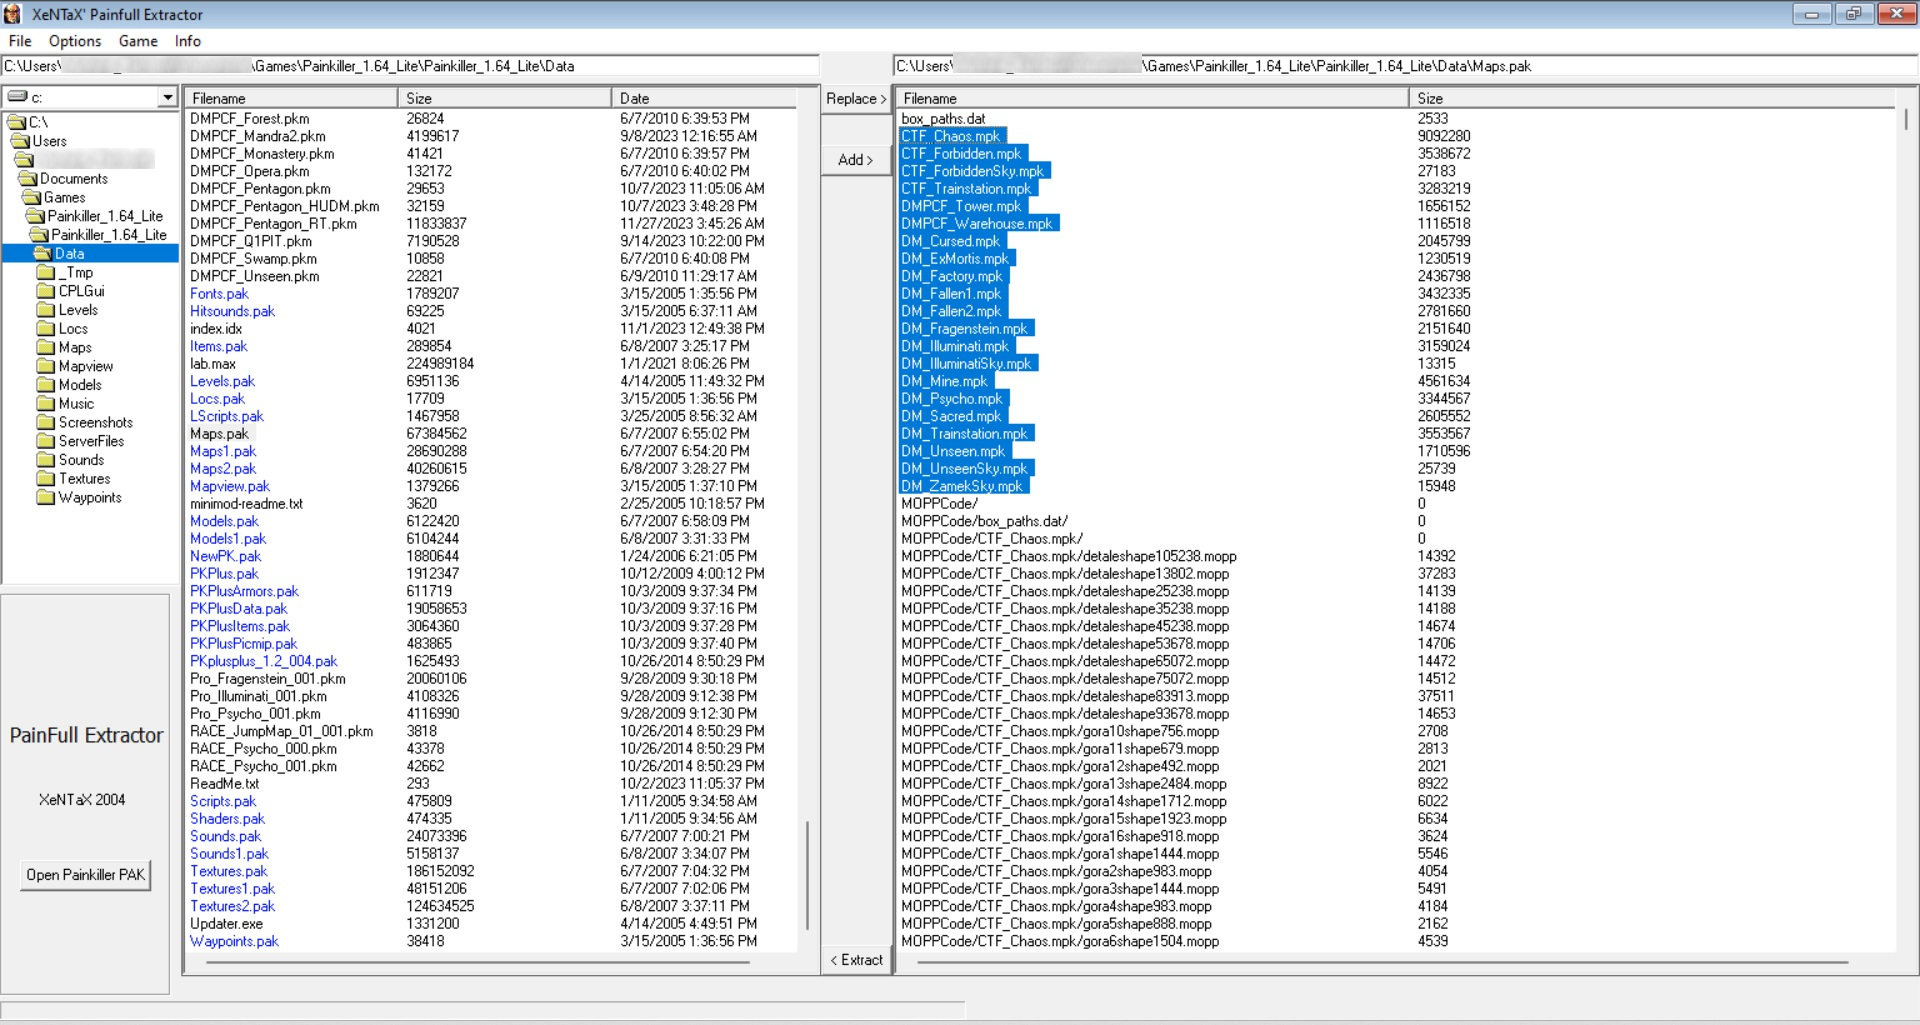
PainFull Extractor was released in 2004 as a side project of MultiEx Commander by Mike Zuurman aka Mr.Mouse/XeNTaX. Latest Version 1.3.2.
This unpacker supports .pak and .pkm archives but cannot unpack some archives with zero-byte files in ..\Painkiller\Data\Maps\MOPPCode\ which is common in Painkiller Resurrection. Also, it has several annoying bugs like errors during the folder navigation, instability. This program is considered outdated but it's still widely used.
You can get the program here.
You need to run PainFull Extractor in a Windows XP compatibility mode as administrator.
PainFull Extractor Guide
Taken from the official readme.txt manual.
Just browse to a PAK file of your choice at the left side of the tool, select it in the file list, and hit Open Painkiller PAK. You will notice the contents (entries) listed to the right.
-
Extraction
Just select all files at once, clicking on the top file first followed by a click on the last while holding down the
shiftbutton. Alternatively just select the files you want, by holdingctrl.To extract, click the button below and in between the two lists, with
<<on it. Voila. It will extract the files into the current path. -
Addition
-
Replacement
Select a file in the file list that you want to use to replace a file in the open archive. Second, select the file you wish to replace in the contents list. Click the
>>button, and wait until it's finished. Done.Warning
PainFull will automatically import the new file, and will NOT create a backup. If you want to mess around with any PAK file, be sure to back it up first and store it somewhere safe!
PainKillerExtractor
PainKillerExtractor was released in 2004 by Andrew Frolov aka FAL.
The tool and the source code itself are located in this repository. This unpacker sometimes fails to extract correctly from an archive but it should be OK for modifying multiplayer maps. The tool basically consists of the PainKillerExtractor.exe file and everything else is a source code.
PainKillerExtractor and pak2zip Guide
Note
Be sure to place PainKillerExtractor.exe with the file you want to extract in a separate folder so that the extraction will not mess the files in your current folder.
pak2zip is a similar tool but it's for Painkiller Exclusive Retail Demo .pak resources.
-
Unpacking by drag-and-drop
You can simply drag and drop the .pak or .pkm archive to this application (drag the .pak archive with the mouse cursor to the .exe file) and it will unpack the resources automatically.
-
Unpacking via CLI
Dragon UnPACKer
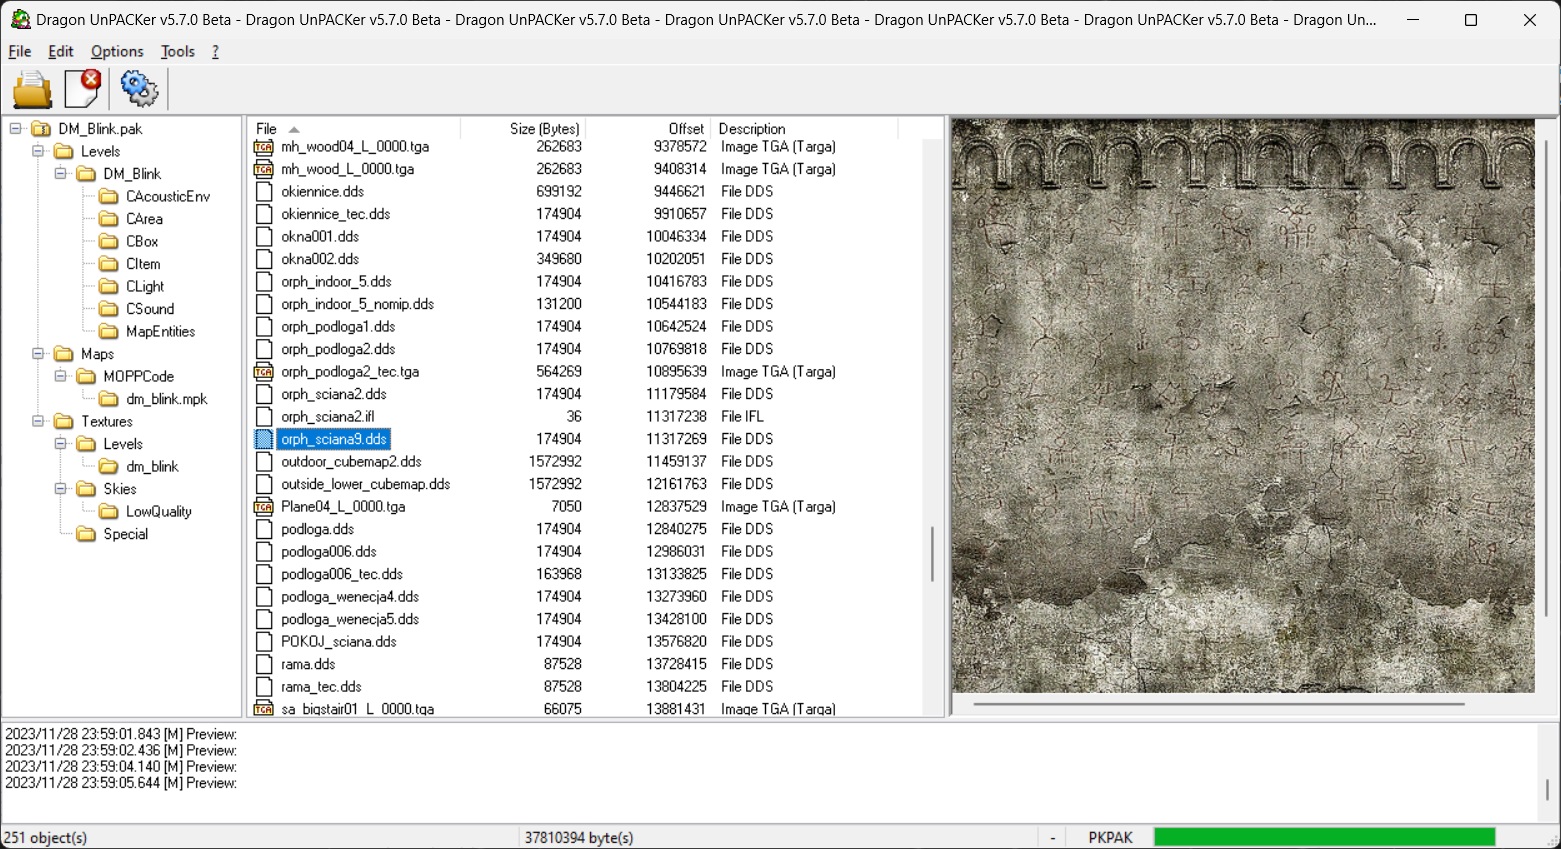
Dragon UnPACKer is an open-source tool for unpacking game resources. Currently, it supports Painkiller .pak files but cannot unpack .pkm by default. To unpack .pkm files with Dragon UnPACKer you need to temporarily rename .pkm file to .pak. For example, rename DM_Blink.pkm to DM_Blink.pak and Dragon UnPACKer will allow you to extract DM_Blink.pak resource in this case. Sometimes this program can break files during extraction but it's a very good program to browse in-game packed resources.
QuickBMS
QuickBMS is an open-source tool for unpacking game resources. QuickBMS is a complex tool with a lot of capabilities so I'll cover it briefly. If you want more details, read their manual in the quickbms.txt file.
Start with QuickBMS
- Download the program from the website.
- Extract the QuickBMS archive.
- QuickBMS uses plugins to extract game resources and we'll need to download one. Go to BMS Search on their website and search using Necrovision or Painkiller keywords. Download the
bms/necrovision.bmsscript and put it in the QuickBMS folder.
Note
If you are going to extract the Painkiller Exclusive Retail Demo resources, you need a QuickBMS plugin called bms/zip2.bms.
Unpack game archive
- Run
quickbms.exeas an administrator. - Select the
necrovision.bmsplugin for Painkiller/Necrovision resources orzip2.bmsfor Painkiller Exclusive Retail Demo resources. - Choose .pak or .pkm file to extract. You can also select all the archives in the folder to be unpacked by indicating asterisk (
*) as a File name or use regex. - Choose the folder where to extract
Reimport to game archive
The idea consists of being able to reimport ("injecting back") the modified files in the original archives. Though, I don't recommend using this option.
- Make a backup copy of the original archive.
- Extract the files or only the ones that will be necessary for modification.
- Modify the extracted files leaving their size unchanged or smaller than before.
- Reimport the files in the archive via
reimport.batorreimport2.batif the former gives errors. Administrator mode is not required. - Open
reimport.batand selectnecrovision.bmsplugin. - Select the .pak or .pkm archive where you are going to import a modified file to.
- Select extracted modified files in a folder. You can use regex to select multiple files and folders and click Save.
Work with files via CLI
Read the manual for more options.
Help command:
List files in an archive without unpacking:
Extract files. It will prompt you to create a folder if does not exist:
Reimport files from the output folder:
Use advanced reimport if the usual one does not work:


